The Internet of Things (IoT) has revolutionized the way we interact with technology. From smart homes to industrial automation, IoT projects have become increasingly popular among hobbyists and professionals alike. If you’ve ever wanted to create your own IoT project but didn’t know where to start, this guide will walk you through the process step by step.
Step 1: Understanding IoT
Before diving into building an IoT project, it’s essential to understand what IoT is. IoT refers to a network of interconnected devices that communicate over the internet. These devices can collect data, process information, and perform automated actions.
Key Components of IoT
- Sensors: Collect data from the environment (e.g., temperature, humidity, motion).
- Microcontrollers/Microprocessors: Process the collected data (e.g., Raspberry Pi, Arduino, ESP8266).
- Communication Protocols: Enable devices to communicate (e.g., Wi-Fi, Bluetooth, MQTT, Zigbee).
- Cloud Platforms: Store and analyze data (e.g., AWS IoT, Google Cloud, Microsoft Azure).
- Actuators: Execute actions based on the processed data (e.g., motors, lights, relays).

Step 2: Defining Your IoT Project Idea
Identify a problem or need that can be solved with an IoT solution. Some beginner-friendly IoT project ideas include:
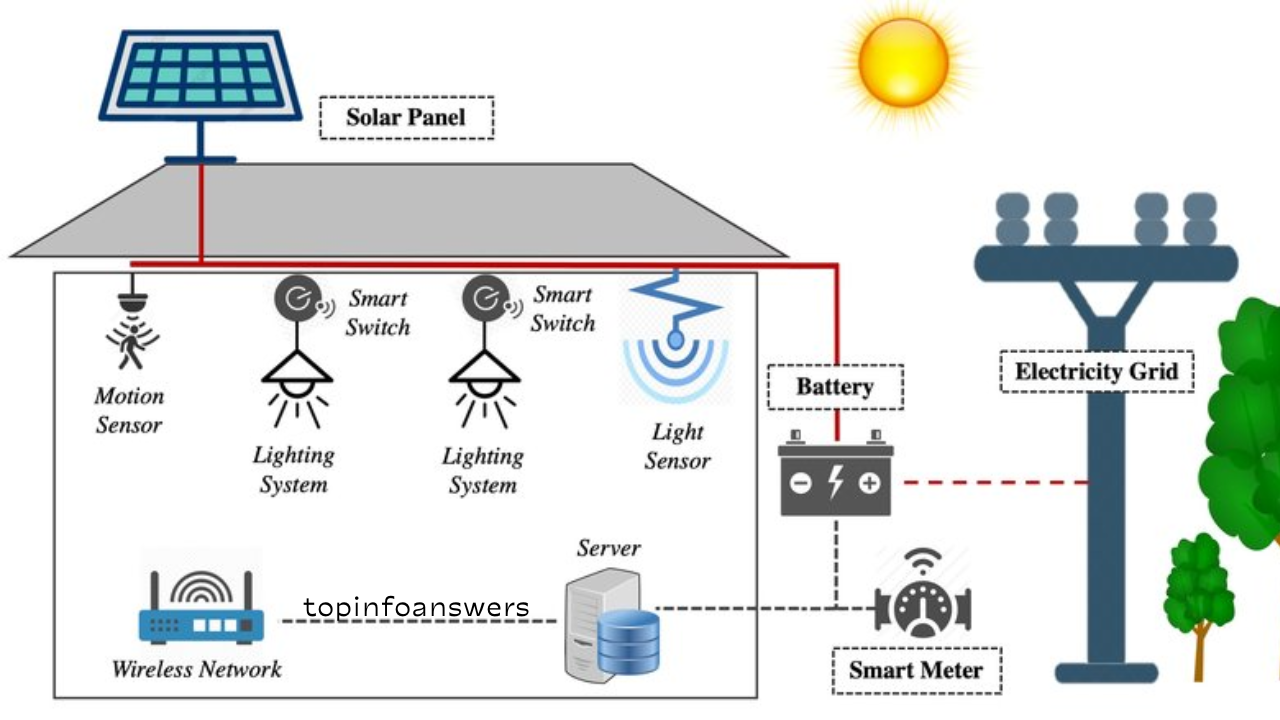
- Smart home automation (controlling lights, fans, or security cameras).
- Weather monitoring system.
- Smart irrigation system for plants.
- Motion-detecting security alarm.
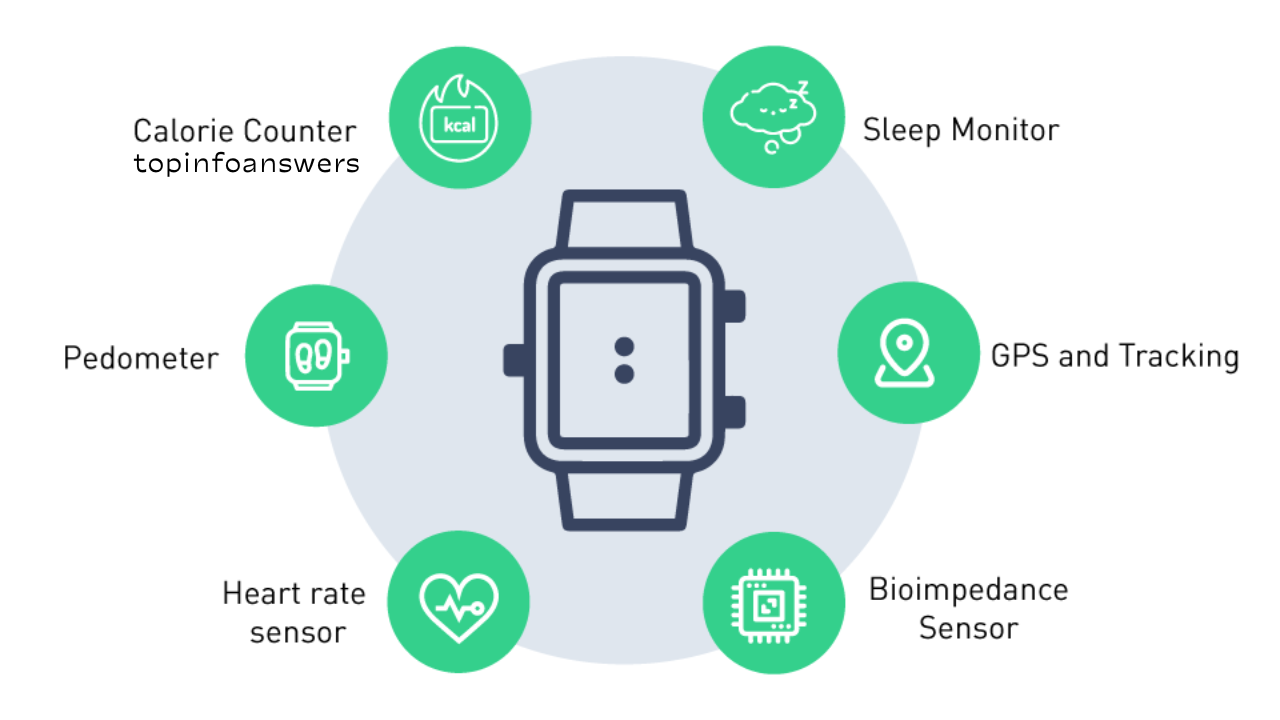
- IoT-based health monitoring system.
Step 3: Selecting the Right Hardware
Once you have a project idea, choose the right hardware components:
Microcontrollers and Microprocessors
- Arduino Uno: Great for beginners; easy to program with simple IoT functionalities.
- ESP8266/ESP32: Ideal for Wi-Fi-enabled IoT projects.
- Raspberry Pi: Suitable for advanced projects requiring more processing power.
IoT and Big Data: How They Work Together to Improve Business Insights
Sensors and Actuators
- Temperature Sensors (DHT11, DHT22)
- Motion Sensors (PIR Sensor)
- Light Sensors (LDR – Light Dependent Resistor)
- Gas Sensors (MQ-2, MQ-135)
- Relays (for controlling electrical appliances)
- Motors and Servos (for robotics projects)
Step 4: Setting Up the Development Environment
Required Software
- Arduino IDE (for programming Arduino and ESP8266/ESP32)
- Python (for Raspberry Pi projects)
- PlatformIO (alternative to Arduino IDE for advanced development)
- Node-RED (for visual programming and automation)
- MQTT Broker (e.g., Mosquitto) (for device communication)
Installing Libraries
Ensure you install necessary libraries for your selected board and sensors. For example:
#include <ESP8266WiFi.h>
#include <DHT.h>
Step 5: Building the Circuit
Using a breadboard, connect your microcontroller to the required sensors and actuators. Use jumper wires to connect:

- VCC to power supply (3.3V or 5V depending on the sensor).
- GND to ground.
- Data Pin to a digital input/output pin on the microcontroller.
Example: Connecting a DHT11 temperature sensor to ESP8266
- VCC to 3.3V
- GND to GND
- Data to D4 (GPIO2)
Step 6: Writing and Uploading Code
Example Code for Reading Temperature and Sending Data via Wi-Fi
#include <ESP8266WiFi.h>
#include <DHT.h>

#define DHTPIN 2
#define DHTTYPE DHT11
DHT dht(DHTPIN, DHTTYPE);

const char* ssid = "your_SSID";
const char* password = "your_PASSWORD";

void setup() {
    Serial.begin(115200);
    dht.begin();
    WiFi.begin(ssid, password);
    while (WiFi.status() != WL_CONNECTED) {
        delay(500);
        Serial.print(".");
    }
    Serial.println("WiFi connected");
}

void loop() {
    float temp = dht.readTemperature();
    Serial.print("Temperature: ");
    Serial.println(temp);
    delay(2000);
}
Step 7: Connecting to the Cloud
Use cloud services to store and visualize IoT data:
- ThingSpeak (for real-time data visualization)
- Blynk (for mobile-based control and monitoring)
- Google Firebase (for database storage)
- AWS IoT Core (for enterprise-level IoT solutions)
Example: Sending Temperature Data to ThingSpeak
WiFiClient client;
const char* server = "api.thingspeak.com";
String apiKey = "YOUR_THINGSPEAK_API_KEY";

void sendData(float temp) {
    if (client.connect(server, 80)) {
        String url = "/update?api_key=" + apiKey + "&field1=" + String(temp);
        client.print("GET " + url + " HTTP/1.1\r\n");
        client.print("Host: " + String(server) + "\r\n");
        client.print("Connection: close\r\n\r\n");
        client.stop();
    }
}
Step 8: Implementing Security Measures
Security is crucial in IoT projects. Consider:
- Using HTTPS and TLS for secure communication.
- Implementing authentication (e.g., API keys, OAuth2).
- Encrypting data before transmission.
- Disabling unnecessary ports to reduce vulnerabilities.
Step 9: Testing and Debugging
After assembling the hardware and uploading the code, test the system:

- Check if the sensor data is accurate.
- Monitor serial output for debugging.
- Ensure network connectivity is stable.
- Use tools like MQTT Explorer or Postman to verify API communications.
Step 10: Deploying and Expanding Your IoT Project
Once your project is stable, consider deploying it:
- Use a PCB (Printed Circuit Board) instead of a breadboard for durability.
- Deploy it in a real-world scenario (e.g., installing a smart home system).
- Expand functionality by adding more sensors or integrating AI for advanced automation.
The Future of Wearables: How IoT is Advancing Personal Health Tracking
Building an IoT project involves understanding hardware, software, and networking concepts. By following these steps, you can create your own IoT solution, whether for personal use or as part of a larger system. Start small, experiment, and scale up your project as you gain experience. Happy building!